It’s been a while since I wrote a photography tutorial post…life has been busy, to say the least! But I’m ready to pick up where we left off. I wrote about aperture and shutter speed in the past, so today we focus on the third aspect of the exposure triangle: ISO, which is just as important as the other two factors, but in a different way.

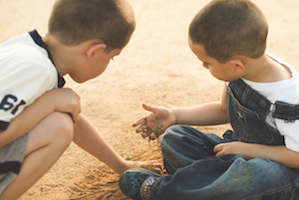
ISO controls the sensitivity of the sensor, so if you are taking photos in low-light situations (indoors or at night, like you see in my photos above of my son when we were decorating for the holidays), dialing up the ISO would allow you to still take photos without resorting to your in-camera flash, because you made the sensor more sensitive to any and all available light coming in through the lens. At ISO 800 my son was still very underexposed, but if I slowed down the shutter speed, he would look blurred as he ran around, and if I lowered the aperture, it would have been near impossible to get him in focus.
ISO doesn’t really have a creative affect like` shutter speed (which allows you to freeze and imply motion) or aperture (lets you choose how much of the shot is in focus), but changing your ISO is the reason you can get more creative with your shutter speed and aperture. The ISO is the work horse of the camera, it picks up the slack. If you need your photo to be less exposed, you dial your ISO way down so you can keep your desired shutter speed and aperture, and if you need more light, you dial your ISO up without changing the overall vision of the picture.
Isn’t ISO wonderful?
The only problem occurs when using higher ISO’s on a camera that doesn’t handle it well. While fabulous at getting shots that other cameras would require flash to achieve (or not be able to capture at all), it can produce something called “noise” (grain or specks) in your photography, so generally, you keep your ISO as low as the situation will allow.

If you have to choose between a little noise or a blurry, unfocused shot, you are better off with a little noise (blurry, unfocused shots are never a keeper, but as you can see, a noisy shot like the one above is perfectly acceptable). Because I photograph for fun and don’t want to miss a single precious moment with my boys, I don’t mind noise (pun intended).
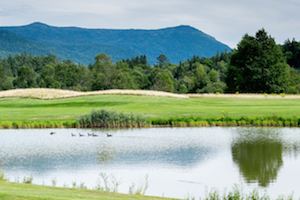
* A higher ISO allows you to close up your aperture to get more of your picture in focus- great when you are taking scenery shots at night or large group photos indoors.
* A higher ISO allows you to use a higher shutter speed so you can freeze motion, not get blur if you accidentally shake your hand, and capture fast moving toddlers.
When to shoot with a higher ISO:
- When shooting night photography
- When shooting indoor photography and getting the shot at the right moment is more important than getting a perfect shot (like at a surprise party, or when your child is doing something totally awesome for the first time and you can’t tell him to go outside in the daylight and repeat it for a clearer shot
- When you want a picture to look a little grainy (if it’s the creative effect you are going for, sort of a Norman Rockwell like photo)
Quick tips on ISO:
Outdoors in bright sunlight – 100
Outdoors in shade or indoors in bright light – 200-400
Indoors near a well-lit window or good lighting 400-800
Indoors in low light or at night – 1600+
Happy shooting!
THese are such great tips. I’m hoping to get my first DSLR soon so I’ll have to keep these tips in mind when I do!
Thanks for the tips! I’ve been playing with my DSLR camera without automatic mode and since I”m not up on all the lingo, a post like this helps me understand things better!
I keep getting better and better with my photography but I keep needing to return to the basics until i get them memorized.
Great tips Penelope. I’m just working out taking photos in low light situations and this was helpful.
I am definitely bookmarking these posts. I am hoping the hubby gets me a new camera for Christmas and I can use all the help I can get with tips on how to take great photos.
I try not to go over 800 on my ISO and use manual mode always. Great tips, Penelope!
This is great advice. I just started shooting at 1600 ISO inside at night with the Christmas lights. I am still working on it, but happy with the shots and lights.
Thanks for the lesson on ISO. I’m still so confused by my camera and I’ve had it for two years.
WOW what a difference for some reason no matter what I read I don’t “get it” I so want to take a hands on class or tutorials on online that include homework.
Your tutorials are so helpful. I have a DSLR but only shoot in auto mode because I need to learn how to use it.
Great tips! One day I’ll get a better camera!
For me adjusting ISO has been the biggest help for my pics.
I just wish it did not mean grainy photos.
Great tips. I know nothing about camera settings actually just pulled my camera manual out to start reading. This helps a lot!
Thanks for the great tips! I need all the help I can get as my photos suck badly.
Yay for ISO! I usually use 3500 indoors at our house since we don’t have much natural light.
I crank it up high myself, totally not scared of it 🙂
I’m going to take a beginner photography class in January and then this will all finally make sense to me and I’ll move off the auto mode! Your tutorials are really good!
Thanks for explaining this so I could understand it. 🙂
Good tips for those starting out! Great job, Penelope.
These are great tips. I am doing just the bare minimum with my camera and really need to learn to do more.
You’ve become quite the photographer, Penelope! I wish I had the interest… but if it ever strikes me, I know I can learn a lot from your tutorials!
I would never in a million years think that photo was noisy. Then again, I know nothing about photography yet and your pictures are truly great!
I took a photography class at the beginning of the year and learned about ISO. If you don’t use it, you definitely lose it. This post was a great reminder of the things I learned. I’m actually going to bookmark it. Thanks!
I wish I had a better understanding of this, but this does help, thanks!
This is so helpful. I like to take pics, but always have a hard time grasping the number. I am book marking this post. Thanks.